rule

Beautiful Bustles

rulef


Bustles are great things to have. They hold the train up so your guests don't have to worry about stepping on it at your reception. There are many possible ways to make a gown bustle depending on the size and shape of the train and the decoration. The decision of how to bustle your gown may be a difficult one so here are some pictures and explanations to help you.

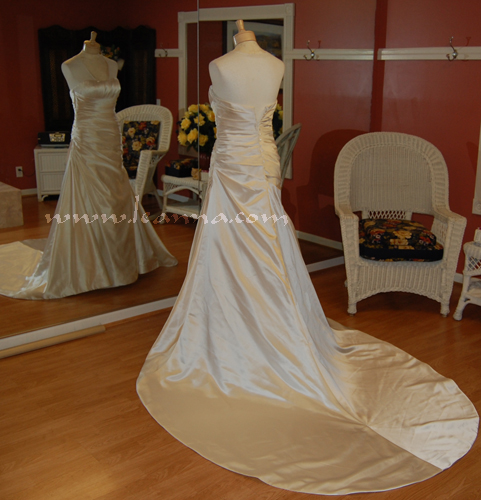
Before I show you the pictures, let me explain a little about bustle riggings. Hooks, eyes, buttons, loops, and ribbons are sewn in the train in specific places and ways to for the support of the bustle when it is up (I call this being rigged). These riggings often can be seen when the bustle is down, or not rigged. Brides often are very specific about not wanting ANYTHING odd showing on the backs of their trains for the ceremony. There is nothing wrong with wanting your gown to be perfect for your wedding day, but I must stress to all of you that visible bustle riggings do not mar the beauty of the train. If there is no decoration on the train that these elements can be hidden in, than they are going to be in the open, but they are very small and I have never heard a wedding guest make a comment about these tiny items on the train. Although visible, they are just never noticed. Trying to hide these items by adding decoration to an unadorned train often makes them more noticeable. So, I recommend that these items be sewn as simply as possible and that the bride work on understanding that they are not as odd as she is thinking.

Having said that - there are many ways to hide riggings. Lace and beading on the train can be a great place to position eyes so they seem like part of the lace. Buttons can be purchased that look like the beading that is already on the gown and will blend in though they are obviously added. If the gown already has satin covered buttons running down the center back seam, more of the same buttons can be sewn for the bustle riggings and guests won't think anything of them even though they are placed along the waist seam. Often, I have found that I can use the original buttons on the center seam of the gown to support a bustle by reinforcing them with stronger thread.

If there is some decoration already on the train, more can be added to hide bustle points that need to be positioned were there is no decoration. I have often taken lace from the inside of a seam I had to take in on the bodice and added it to the train where loops or hooks needed to be sewn for the bustle.

And, even if the train is totally unadorned, you can sometimes add a small amount of beads and/or lace to cover the bustle points if there are several points and the pattern results in what might normally be seen on a train. Otherwise, I strongly advise against trying to cover points with decoration. It only serves to bring more attention to them when you are trying to disguise them.

To add one more point about points showing. In the pictures here there are points that show. As you look at the pictures, if you find it hard to see the points, than so will your guests at the ceremony. Making them small and neat is the best way to make them as inconspicuous as possible.


The Ballroom Bustle

This is a typical Bustle and is often called an Overbustle. I've started calling this a Ballroom Bustle because it results in making the gown look like a typical ballroom gown. Buttons or hooks are positioned at the waist and loops are sewn at carefully plotted points on the train so that when they are looped on the buttons the train is all one length. It's not always possible to have every bit of the train to be perfectly straight, but a skilled sewist can come very close.

Here is a shot of the same gown with the bustle down so you can see the shape and size of the train.

For this gown I advised we use satin covered buttons because the gown already had them and it usually looks best when there is no decoration at the waist to hide the bustle points.

This is a close up shot of the train. The loops are there but very unnoticeable. If you are concerned that guests at your wedding will see these and spend the whole time at the ceremony wondering why you have loops on your train, don't be. No one ever looks that hard at your backside.

See Step-by-Step instructions for creating this bustle here: https://www.youtube.com/watch?v=GCkhWvI0y_4&t=1099s

More Ballroom Bustles


The Tufted Bustle

This gown presents a special problem. The skirt is tufted with jeweled appliques at each gathering spot to accentuate the tuft. The bride didn't like the idea of either Ballroom or French Bustles for both hid several of the jeweled appliques. We decided to make each Tuft a bustle point and anchor them just below the tuft above them.

To make this work I had to change the way I usually make the pick-up and anchor points. I decided to sew the hooks at the pick-up points because I could hide them behind the jeweled appliques and the anchor points would be thread eyes. In this picture you can see two tufts with the jeweled appliques with an anchor point sewn about half way between them.

Here you can see the hook behind an applique, looped onto it's anchor point. I sewed the hook facing the applique instead of the usually way of facing out so that when looped with the eye, it sits backwards so it won't easily get dislodged.

Here is what the gown looks like with all 16 points rigged. Quite Pretty!

Here is a site that has a similar bustle design, but done in the French Style: http://www.spnindiana.org/tips_paneled_bustle.htm


The French Bustle

A French Bustle is often called an Underbustle because it hooks up under the skirt. It's a great option for situations like this gown where all of the train decoration is right below the waist area. An Overbustle would cover up all that gorgeous lace. With patience the folds can be placed so that it maximizes the exposure of the decoration.

A French Bustle often looks more fluffy than the Ballroom Bustle because all the fabric is on the outside and there is often netting in the folds to make them more prominent. In the Ballroom Bustle all the fabric is on top of itself and weighing that fluff down giving a flatter look, but both bustles are going to add dimension to your butt area. Don't worry about it. Your guests will not think you grew a big butt between the ceremony and the reception.

The French Bustle is my favorite because it is the most secure. It doesn't employ hooks or buttons but ribbons that you tie in place so it can be as secure as you like to knot it and nothing shows on the outside when the bustle it up.

Though this is not the way I do it, here's a link to a site with step-by-step instructions on how to make a French bustle:
http://www.sewdeb.com/bustle2.html

See Step-by-Step instructions for creating this bustle here:
https://www.youtube.com/watch?v=8VXQdXxVQow&t=1s


The Austrian Bustle

This gown is Satin Organza. It is a beautiful and flowing fabric, but does not take well to the regular bustle styles I mostly use. Through much discussion with the bride we tried many creative ways to pick-up the train but could find one she liked. I told the bride I had heard of an Austrian Bustle but had never seen one. We decided to try rigging the train into an Austrian shade effect.

I put the skirt on the dress form inside out and pinned up the Taffeta lining which was the right length already. I carefully sewed metal eyes along the back and princess seamlines at 3" intervals making sure to catch both the Satin Organza and the softer Organza liner layer.


I threaded a length of 1/8" ribbon through the eyes and knotted it at the bottom eye. Pulling on the top of the row of eyes gathers the seams to a point where it created a drape at the hem that I could set to any height I wished by knotting the ribbon to the top eye. I marked the placement of the knot with a red dot on the ribbon.

I set the skirt on the dress form right side out and re formed the bustle by knotting the ribbons at the red dots I had made. It created a really neat Austrian effect that the bride loved.


The English Bustle

The English Bustle is a low Ballroom style bustle used on gowns that are narrow in the hip area but have fairly long, wide trains. In the example above 7 points were used in close order to give a gathered effect. Hooks were sewn under the satin band that was a design element on the original train. Often, an extra design, like a lace applique, is used to both hide the hooks and add to the charm of the bustle.


The Pick-Up Bustle - Ballroom Style

The gowns I see most these days are simple in their design, fitting closely to the body with little skirt "fluff". Because there is less fabric in the hip area and the train is usually shorter, trying to do a Ballroom or a French bustle as shone above would just look silly.

This gown has lovely buttons running down the whole length of the center back seam, so I chose to use one for the anchor point.

Here is a shot of the same gown with a Pick-Up Bustle. Only one pick-up/anchor point is chosen. The anchor point is set much lower than for the other bustles because the skirt is not wide enough. Trying to pick-up the back of the skirt to the waist area would make it much too short on the sides.

Here is a close-up of the pick-up point's loop hooked on the anchor point button. Since the buttons had plastic shafts, I felt a little support was smart, so I sewed a white hook above the anchor point button. The hook is actually supporting the weight of the train, not the button.

See Step-by-Step instructions for creating this bustle here:
https://www.youtube.com/watch?v=MhVq4a2lzVc&t=1s

More Pick-up Bustles


The Pick-Up Bustle - French Style

This gown will be bustled with a one point Pick-up, but using the French style. One set of ribbons and loops will be positioned so that the train will be held by that one point under the skirt.

This gives a really neat effect that is getting quite popular. Like the French Bustle, it's great if much of the design is high on the train or if there is little or no design like on this gown.

Here is a view of the 2 Pick-Up Bustle styles. Each bride chooses what they think looks best. Either gown would look fine with either design, but I think these 2 brides choose their style well.

See Step-by-Step instructions for creating this bustle here:
https://www.youtube.com/watch?v=MhVq4a2lzVc&t=1s

More Pick-up Bustles

The Side Sling Bustle

This is a unique bustle that is not hard to do but looks elegant. It's actually a ballroom pick-up bustle with the anchor at the side seam. This gown was perfect for this style because of it's asymmetrical design.


This is a close up shot of the side anchor. The hook is hidden inside the pleat. Positioning the pick-up point is a bit tricky. I wanted the pick-up point loop to be on the center back seam and that worked just fine for this train, but you may need to position yours differently depending on the width and length of the train.

More Side Sling Bustles to Come


Train Flip

This is a technique that I know many Bridal Alteration Specialists have been doing for many years but I did not have any bridal customer of mine like the idea until recently. This gown belongs to a friend of mine who did not like the Ballroom or French options pictured above so I suggested we try to flip the train under and she loved it. It took 13 points to get the whole train to rest evenly along the back of the dress but it was worth the effort. The Pick-up point loops are along the underside edge of the hem and the Anchor point hooks are sewn to the lining only and positioned as needed to get the whole train to flip under itself. It was not difficult but did take a bit longer to design and execute than my other bustle designs.

More Train Flips


Sash Solutions

The bow and sash on this gown presents a unique problem. It is an extension of the collar not of a waistband like many sashes. Also, most sashes are detachable, but this one is not. I discussed with the bride the option of making it detachable so she could remove it for the reception but we both thought that would take away too much from the gown. We designed this draping bustle on the sash using hooks and eyes placed on the sash and under the collar in the back, then bustling the gown train with a Ballroom Pick-up Bustle.

More Sash Solutions


Combining Styles

For one reason or another, a gown may not fit into any one bustling style and a combination of techniques have to be used to get the train up and away from where guests could step on it. Often the layers have to be bustled separately, but can still be done in the same style. This gown didn't take well to that. Both the bride and I liked the look of a Ballroom bustle for this back but the sheerness of the organza made the lining look very funny when I pinned it into a Ballroom Bustle.

So, I tried switching the lining to a French style.

The resulting Bustle was soft and layered just right.

See Step-by-Step instructions for creating this bustle here:
https://www.youtube.com/watch?v=MhVq4a2lzVc&t=1s
https://www.youtube.com/watch?v=8VXQdXxVQow&t=1s

More Combinations


Same Difference


Quite often the decision of how to bustle a gown is complicated by creative decoration. In the past few years it has become very popular to add color to wedding gowns. Though beautiful, the colorful patterns can create an interesting challenge for the bustle placement.


I can't tell you how many questions I have answered about this particular design. Alfred Angelo is an incredible designer with many beautiful gowns to his credit. When I happened to have 2 brides entrust me with the altering of their Alfred Angelo gowns I took the opportunity to stage some pictures to show you that there are options even when it seems that designers are doing their best to make our job difficult.

On the left is the gown pinned in a Ballroom Bustle style that sets the points to display the maximum amount of the lovely boarder design. On the right is a simple Pick-up French Bustle that still shows much of the red inset but in a more subtle way.


My bride with the black gown liked the Ballroom Style but my Red bride opted for something a little different. We did the Pick-up Ballroom Bustle adding 4 more points on the side to display more of the boarder design. For the center point I used a button that was already in the dress design as the anchor point and made a loop at the pick-up point on the train. For the side points I used 2 hooks & eyes to hold out the embroidered pattern better than just the one point in the center could.


Not the Bride

It has become popular for other gowns in the bridal party to have trains. These have been mostly small so far but I have noticed a trend for them to be getting more dramatic. I have bustled many Bride's Maid's gowns with the simple pick-up style, but I am now seeing gowns that need more elaborate bustle designing.


This is a Mother of the Bride gown with a substantial train. There is an added problem with the skirt seam design being on the diagonal. I could get the back up with the pick-up style but the sides were still dragging, so I went to a 4 point Ballroom Bustle.

Because this gown is not white or ivory, the covered buttons we usually buy for this purpose would be very noticeable. I used fabric front the hem to make covered buttons that match the gown and are very unnoticeable.

The points were a little tricky to figure out because of the diagonal seam but the bustle looks great.


EmailLink

Got any questions or comments?


Bridal Advice SSI
Bridal Index | Bridal Shopping Rules | More Shopping Rules | Bride's Maid Shopping Rules | Strapless Gown 101 | Store Policies | My Policies | Bridal Fittings | Alteration Cost | Bustles | Impossible? | Bride & Salon Advice | General Q & A | Bustle Q & A | Bridal Related Links | Bridal Business Studio

Main SSI

Got any questions or comments?

home
The Bridal Studio Beautiful Bustles The Home Pro Studio Duct Tape Double Dress Forem Studio

This site created and maintained by: Leanna Studios
© Copyright 1994 by Leanna Studios. All Rights Reserved.