


Here are some thumbnail images of
my NEW Basement Studio workroom. This better be the absolute last time I do
this !!! Since I started in business April 1, 1984, I have set up 10 Workspaces.
This room is in the basement of our
new home. We bought this house because it had this nice, full and empty basement
so I could design what I wanted. About $26,000 later - this is what it looks
like.
Click on the image if you want to
view a larger version
 When someone drives into my driveway, there is a nice 3 car parking area in front of the house were customers can park. rides often want to have a Mom or friend at their fittings and bride's maids often come in groups of 2 or 3. This gives a few places for cars to park. When someone drives into my driveway, there is a nice 3 car parking area in front of the house were customers can park. rides often want to have a Mom or friend at their fittings and bride's maids often come in groups of 2 or 3. This gives a few places for cars to park.
|
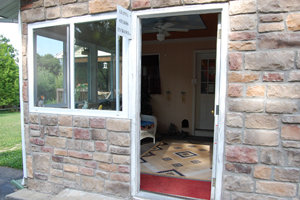 A porchway gives customers a place to go if it's raining and get settled before they ring my bell. A porchway gives customers a place to go if it's raining and get settled before they ring my bell.
|
 This is inside the side door. I have a hook on the wall for drop-offs and pick-ups. The locking mail box you see is for leaving payments. I don't often use this and only for well known customers. It's a nice convenience for them to get or leave items when I'm out. This is inside the side door. I have a hook on the wall for drop-offs and pick-ups. The locking mail box you see is for leaving payments. I don't often use this and only for well known customers. It's a nice convenience for them to get or leave items when I'm out.
|
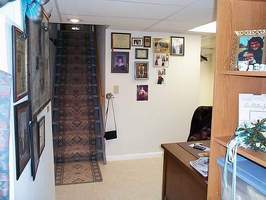
This is the stairway
coming down to the basement. I would have liked to have a separate entrance,
but since we could not find a house with one, this house had the basement
stairway right by the side door.
From this entrance you can
step into my Office area, turn right into the dressing Room, or turn left
to go into the Kitchen/Pantry/Laundry Room. |
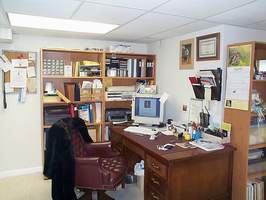 My
office has had various changes for it to reach this stage. I think as it
is pictured here is where I will be keeping it. The computer equipment and
wires are tucked neatly beside the desk on the bottom shelves of the bookcase
you can see to the left of the desk. I like this arrangement. Trying to
do my office work on my sewing workbench was less efficient. My
office has had various changes for it to reach this stage. I think as it
is pictured here is where I will be keeping it. The computer equipment and
wires are tucked neatly beside the desk on the bottom shelves of the bookcase
you can see to the left of the desk. I like this arrangement. Trying to
do my office work on my sewing workbench was less efficient. |
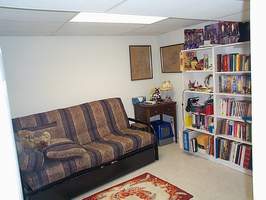
This is officially the Dressing
Room. It's nice and spacious for my brides. The couch is a futon. It makes
a nice transition from a place for customers to sit to a bed to sleep
on since this room can be used for a guest room. The large drawer under
the bed houses my linens during it's Dressing Room state.
To the right of the bookcases
(outside the view of this picture) is a door to a spacious walk in closet/storage
room. Here I keep my personal items, dressers, shelves and a clothes rack.
We also keep out of season items here like Christmas decorations. |
|
 This
is the Kitchen/Pantry/Laundry Room that you can get to if you turn left
behind my office chair. This
is the Kitchen/Pantry/Laundry Room that you can get to if you turn left
behind my office chair.
It's a great room we use for
extra storage of food stuffs and doing laundry. We had planned on having
a freezer, but I was given the nice refrigerator you see on the left.
It has a large freezer compartment and I can keep lunch/snack type foods
in the fridge part. |
|
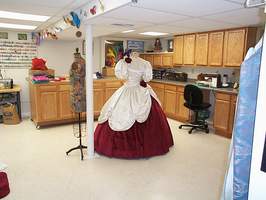 Walking
past the office takes you into the Main Room. This is a generous 20' X
20' room with a full bathroom to one side. The gown set in the middle
of the room is there to show you how I like to present my brides with
their gowns. This is really cool because a bride doesn't otherwise get
this view of her dress. Pictures are nice, but you won't believe the looks
I see on bride's faces when they see their gown this way. It's a kin to
falling in love. Walking
past the office takes you into the Main Room. This is a generous 20' X
20' room with a full bathroom to one side. The gown set in the middle
of the room is there to show you how I like to present my brides with
their gowns. This is really cool because a bride doesn't otherwise get
this view of her dress. Pictures are nice, but you won't believe the looks
I see on bride's faces when they see their gown this way. It's a kin to
falling in love.
This also makes it easy to
explain how the bustle works.
This space also doubles as
a workout studio for me and my son. |
|
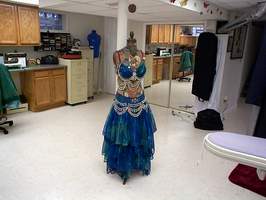
 This
is the view from the pole you saw in the last shot. Behind the mirrored doors is my furnace and water heater.
I figured I had to have doors to this area anyway so why not make them
mirrored? It works great. This
is the view from the pole you saw in the last shot. Behind the mirrored doors is my furnace and water heater.
I figured I had to have doors to this area anyway so why not make them
mirrored? It works great.
The door to the left of the
mirrors is my work closet. I've not had a closet just for work before,
it's great to not have to mix client's things in my personal closet.
The hanger in the center of
the picture is where I put items that are finished and ready for pick-up.
If a client wants to try something on before taking it, I can easily whisk
it into the Dressing Room (you can see the door in the far right of the
picture). |
|
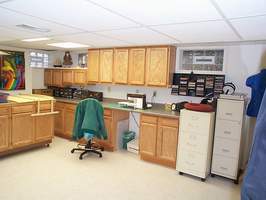 Along
the back wall of the Main Room is the Craft/Beading Center. Here is stored
things that are not directly related to sewing. Embellishment and Beading
supplies are here too. One cabinet has ribbons neatly arrange in boxes.
Another has buttons. If you click on this thumbnail to get the larger
view you can more easily see the tiny drawer cabinets in the left corner
of the countertop. I use these for my large collection of beads. Along
the back wall of the Main Room is the Craft/Beading Center. Here is stored
things that are not directly related to sewing. Embellishment and Beading
supplies are here too. One cabinet has ribbons neatly arrange in boxes.
Another has buttons. If you click on this thumbnail to get the larger
view you can more easily see the tiny drawer cabinets in the left corner
of the countertop. I use these for my large collection of beads.
|
|
 This
is my Layout Table. I couldn't decide exactly where to put it so I had
them put wheels on it. I also couldn't decide what size to make it. I
wanted it to be 5' X 10', but I didn't want to give up that much space
in my fitting area or work out space. So I asked the contractor to make
a table 4' X 8' with a 1' drop leaf along the 8' side. See next picture. This
is my Layout Table. I couldn't decide exactly where to put it so I had
them put wheels on it. I also couldn't decide what size to make it. I
wanted it to be 5' X 10', but I didn't want to give up that much space
in my fitting area or work out space. So I asked the contractor to make
a table 4' X 8' with a 1' drop leaf along the 8' side. See next picture.
|
|
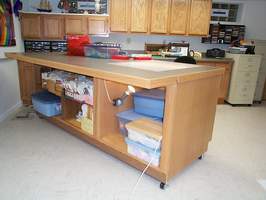 This
is the view from the back of the Layout Table. The front is cabinets.
You can see the drop leaf in it's up position. That white thing on the
end is an underlit panel I can use for pattern drafting/copying and designing. This
is the view from the back of the Layout Table. The front is cabinets.
You can see the drop leaf in it's up position. That white thing on the
end is an underlit panel I can use for pattern drafting/copying and designing.
The table was custom built by the contractor who did my renovating of the room. I drew up plans of what I wanted and gave them detailed drawings with meticulous measurements of what I wanted. They did not follow my plans and some day I will find someone who will fix the table to be what I originally wanted. |
|
 This
is the main workstation for sewing. It's very much like all my others.
I'm a creature of habit in this way. I'm used to having my tools in certain
places. This
is the main workstation for sewing. It's very much like all my others.
I'm a creature of habit in this way. I'm used to having my tools in certain
places.
The counter is a generous 10'
X 3'. Great for wedding gown work. The three cabinet doors you see under
the counter hold my meager stash. I don't keep yards of fabric around
that aren't designated for a project. I've just never gotten into that,
but I do keep reasonably sized scraps of past projects, a box of shoulder
pads and another one of zippers.
To the left of the picture
is the pressing corner. Supplies are in the cabinet behind the board and
in the drawers. |
|
 Here's
the view of the Main Room from the Workstation. The pole is a pain, but
it holds the house up so I guess I'll work around it. You can't see it
in this picture but near the top of the pole on the panel that has all
those butterflies on it is a hook that I use to hang wedding gowns on
while discussing items with the bride or when they are being steamed. Here's
the view of the Main Room from the Workstation. The pole is a pain, but
it holds the house up so I guess I'll work around it. You can't see it
in this picture but near the top of the pole on the panel that has all
those butterflies on it is a hook that I use to hang wedding gowns on
while discussing items with the bride or when they are being steamed.
The dressmaker form was a gift
from Talbots. They often have antique items to decorate their stores and
this form was in one of the stores I service for many years. I tried to
buy it often. One day corporate headquarters told them it was stale and
to get rid of it . . . The other mannequin forms you see in the pictures
above also came to me as Talbots upgraded their display items. A good
idea for those of you wanting some forms for display is to tell your favorite
store that if they ever need to get new ones you would be happy to cart
the old ones off for them. |
2009 update:
OK, I lied about that being the very last workspace I would create. After Christmas I decided to make a change. The stairs have been a problem for many customers so I decided to move my fitting process to the upper level of the house. There is a room off the side door that used to be a garage. Some time before I bought this house, someone redisigned it to be a den. It didn't work well as a den for me so I was using it as a dining room.
 This is inside the porch area you saw above where customers used to walk through to go downstairs to my basement studio. It's much nicer to have this be the entrance into the fitting studio. We built a nice dressing room using 2 wood doors set one on top of the other and stained. Simple molding, a nice trim for finishing, and a door that swings both ways makes for a really nice dressing room. This is inside the porch area you saw above where customers used to walk through to go downstairs to my basement studio. It's much nicer to have this be the entrance into the fitting studio. We built a nice dressing room using 2 wood doors set one on top of the other and stained. Simple molding, a nice trim for finishing, and a door that swings both ways makes for a really nice dressing room.
|
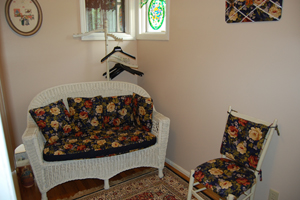 The dressging room is very spacious where 2 or 3 ladies can dress easily. The dressging room is very spacious where 2 or 3 ladies can dress easily.
|
 I keep a supply of hangers in the dressing room. Most brides bring their gowns on hangers and in bags, but these hangers often break and many non-bridal customers don't bring hangers. Hanging the customer's garments helps to keep them in nice condition. I keep a supply of hangers in the dressing room. Most brides bring their gowns on hangers and in bags, but these hangers often break and many non-bridal customers don't bring hangers. Hanging the customer's garments helps to keep them in nice condition.
|
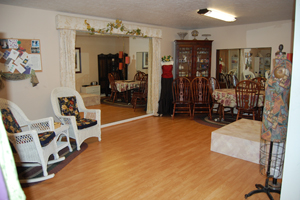 Leaving the dressing room the customer enters the fitting room that is quite spacious giving lots of floor to test bridal hems. This used to be my dining room that we use about twice a year. I decided it could be used the rest of the time for fittings. The 100" X 80" mirror is the largest I could order and it's WONDERDFUL! Brides love it. I can close the drapes and put the leaves in the table any time I want to use the room for a nice dinner. I have even entertained customers here. Leaving the dressing room the customer enters the fitting room that is quite spacious giving lots of floor to test bridal hems. This used to be my dining room that we use about twice a year. I decided it could be used the rest of the time for fittings. The 100" X 80" mirror is the largest I could order and it's WONDERDFUL! Brides love it. I can close the drapes and put the leaves in the table any time I want to use the room for a nice dinner. I have even entertained customers here.
|
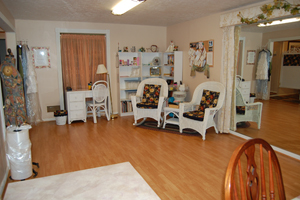 The view from the other end shows my desk area and places for guests to sit. Most brides bring someone with them to fittings. It's most likely to be the Mom, but anyone is welcome. It's very helpful for the bride to have someone to bounce ideas off of and to help her make difficult choices. The view from the other end shows my desk area and places for guests to sit. Most brides bring someone with them to fittings. It's most likely to be the Mom, but anyone is welcome. It's very helpful for the bride to have someone to bounce ideas off of and to help her make difficult choices.
|
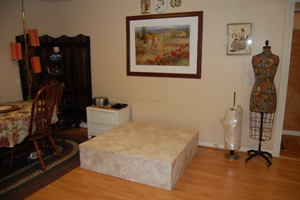 One of the other reasons why I wanted to move my fitting area upstairs is so I can have a stand. The ceiling height is just too low in the basement. This stand was custom made for me. It's 12" tall and 4' X 4'. It is braced to be very sturdy and large enough to pin a hem on the most voluptuous of bridal skirts. One of the other reasons why I wanted to move my fitting area upstairs is so I can have a stand. The ceiling height is just too low in the basement. This stand was custom made for me. It's 12" tall and 4' X 4'. It is braced to be very sturdy and large enough to pin a hem on the most voluptuous of bridal skirts.
|
So, there's my new fitting studio. I'm very happy with it and so are my customers.
EmailLink
Stitch SSI
Stitch Index |
Old
Basement | Small
Appartment | Larger
Appartment | New
Basement | 2022 Basement
Work Pictures |
Bio
| Customer Pictures
Main SSI
 This
site created and maintained by: Leanna
Studios This
site created and maintained by: Leanna
Studios
© Copyright 1994 by Leanna Studios. All Rights Reserved. |

![]()

![]()

