A Stitch In Time


  Visit Our NEW site at: LeannaStudios.com

Here are some thumbnail images of my old basement studio workroom. I used this room from 1993 til 1999.

Click on the image if you want to view a larger version.
 
Me on Bike ThumbnailThis is the way I get my exercise. Sewing is often such a sedentary occupation. You are getting up and down from one sewing machine to another, and back and forth from the cutting area to sewing area to pressing area. But this is not really enough to avoid getting a bit flabby, so I ride a bike while I compute. This works because my bike is an older model with stationary handle bars, and my keyboard has a touchpad instead of a mouse. I simply loosened the screw that held up the handle bars and slid them down into a position that made it easy to rest my keyboard on.


Studio Picture 1

This picture was taken before I rearranged my work rack and book cases, but I've left it because it shows my computer/office nook well. The computer and printer are on the flood under the desk and the monitor rests on top of my legal sized, 3 draw filing cabinet. I love this cabinet because of the extra wide draws. You can file hand drafted patterns without having to fold then into tiny bunches, stencils that are bigger than 8 1/2" X 11", and various other oddities that need somewhere to belong.

 
Studio Picture 2

On the right hand wall, note the thread rack. It holds over 300 spools. I can keep all the colors I could ever need for alterations here. They are made of a 3/4" ply wood board 40" X 26". All we did was drill holes at a slight upward angel and glued 4" dowels into each. I spaced them for the different spools. The 2 bottom rows are 3" apart for the cones, the rest are 1 1/2" for the regular spools. Each dowel is labeled for the color that belongs there so when I am making a trip to the store I can look at my rack and easily make a list of what colors I need to get. I will also buy a spool for one that is getting low. These and most used thread colors I keep in one of the drawers on the shelf above the sewing machine. I keep an extra spool of these there so when I use up a spool I check this drawer and can replace it without making an extra trip to the store.

In this shot you can also see the two main sewing machines I use, a Singer 20U33 an a Viking 990. Situated in the corner between then is my telephone that has a headset receiver, for hands free phone use. I can use the phone while working on either machine. I can even set the phone closer to the computer and use it there too.

If you look closely you can see the special electrical strip I had installed under the work tables. It runs from behind the Singer, where it and the computer serge protector is plugged in, around the corner and down the well to the pressing area. There is a plug every 6". It's soooooo handy!

 
Studio Picture 3

Along this wall is my main work area. All the shelving here and over my desk in the first picture was mounted using hook brackets I got at the local hardware store. They are handy for many things: hanging garments to be worked on from the same order as what you are currently working on, hanging the train of a wedding gown while you are working on the bodice, clipping notes or various reminders so they are right in front of your face, hanging tape measures, and anything else you need handy.

In this shot you can see my two sergers. They are both Huskylocks and use the same foot peddle plug. If I need the 4 threader, I simple more the 3 threader to the back and plug the foot peddle into the 4 threader (which is already plugged into the wall because I have all those outlets!).

 
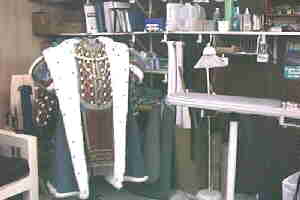
studio picture 4I put this shot up mostly so you could see Henry. This was taken before I finished the Henry VIII costume I made for my husband, but you can see most of the details. If you'd like to see him in the finished costume click here.

 
studio picture 5

You need a place for clients to sit while you discuss the project or for a companion to sit while you are doing the fittings. I don't love this couch, but we couldn't get it up the stairs so I might as well make it useful. I hope to recover the cushions with something more cherrie soon.

On the wall are framed certificates, diplomas, pictures of some of my work, and my Threads article on fur insets. At first I thought it was a bad idea, but customers like seeing your achievements. I think it makes them more open to trust your professional judgment.

 
studio picture 6

I am much more pleased with this hallway since I moved the work rack out and put up these shelves. It makes for a pleasant entrance and a great place to store my ever growing collection of books and magazines.

 
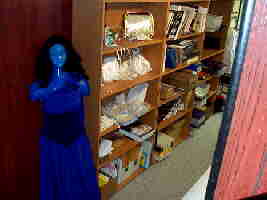
Studio Picture 7This shot is taken from the stairway so you can see that my first bookcase has a display of bridal items. And of course there is my Duct Tape Double wearing an Elf Princess gown I made for myself.

 
Studio Picture 8This is the end of the hall and the "work in progress" section of the rack. It is sectioned by days of the week when items are due. When finished an item is moved to the end of the rack to the "ready for pick-up" section.

 
Studio Picture 9Here's a view of the whole cutting table from the pressing corner. It was made from the old kitchen cabinets I couldn't throw out when we remodeled the kitchen. I wish it was longer but we had to work around the support pole in the middle of the room.


EmailLink

Got any questions or comments?


Stitch SSI
Stitch Index | Old Basement | Small Appartment | Larger Appartment | New Basement | 2022 Basement
Work Pictures | Bio
| Customer Pictures

Main SSI

Got any questions or comments?

home
The Bridal Studio Beautiful Bustles The Home Pro Studio Duct Tape Double Dress Forem Studio

This site created and maintained by: Leanna Studios
© Copyright 1994 by Leanna Studios. All Rights Reserved.